Dyeing Black Parchment (and making a virtue of necessity)
- beesenichola
- Oct 19, 2023
- 3 min read
This is a topic I get more questions on than any other. So this will be two parts: the usual art along with me post, and then an FAQ about dyeing parchment.
For those of you playing along at home, last spring I did a rather chemistry-heavy post on making oak gall or tannic acid ink. The fact that I make it by the quart isn't just so the weights math easily. A lot of my blackity black ink is used for dyeing my parchment.
Black parchment manuscripts seem to have been quite rare in period, but they are greatly loved and admired, and disproportionately represented in the art of reenactors and experimental archeologists. The "seem to have been" is because we can only judge based on the very small number of extant manuscripts. Why can't we extrapolate and say the existing number of black parchment manuscripts is directly proportionate to the original proportion of black parchment to undyed manuscripts?
Because, as you know Bob, undyed parchment is pH neutral and very stable, while iron gall / oak gall / tannin inks are very acidic. When these inks are used for calligraphy they will literally eat through parchment over time. That's destructive enough, but when the entire manuscript is saturated in and chemically bonded with an acid, then it can crumble or otherwise vanish without a trace over the centuries.
The subtitle on this post is because I hadn't really planned on dyeing this hide. I personally don't do black hours pieces, and it is much less popular among my client base than undyed or purple parchment. But this hide had some brown and gray discolored spots that did not lighten with scraping or sanding. So rather than have marks detract from this piece, I decided to dye half of it.
I do the dyeing at the very end of the process. Stretching, scraping, dry scraping, sanding down to 800 grit...all of it is done before dyeing. This is a fully prepped and ready to use sheet of parchment.
I store my ink in Mason jars with plastic lids. That is the best combination I have found for durable plus inert. I apply the dye with a foam craft brush. Any size will work, but 2inch is probably my favorite.
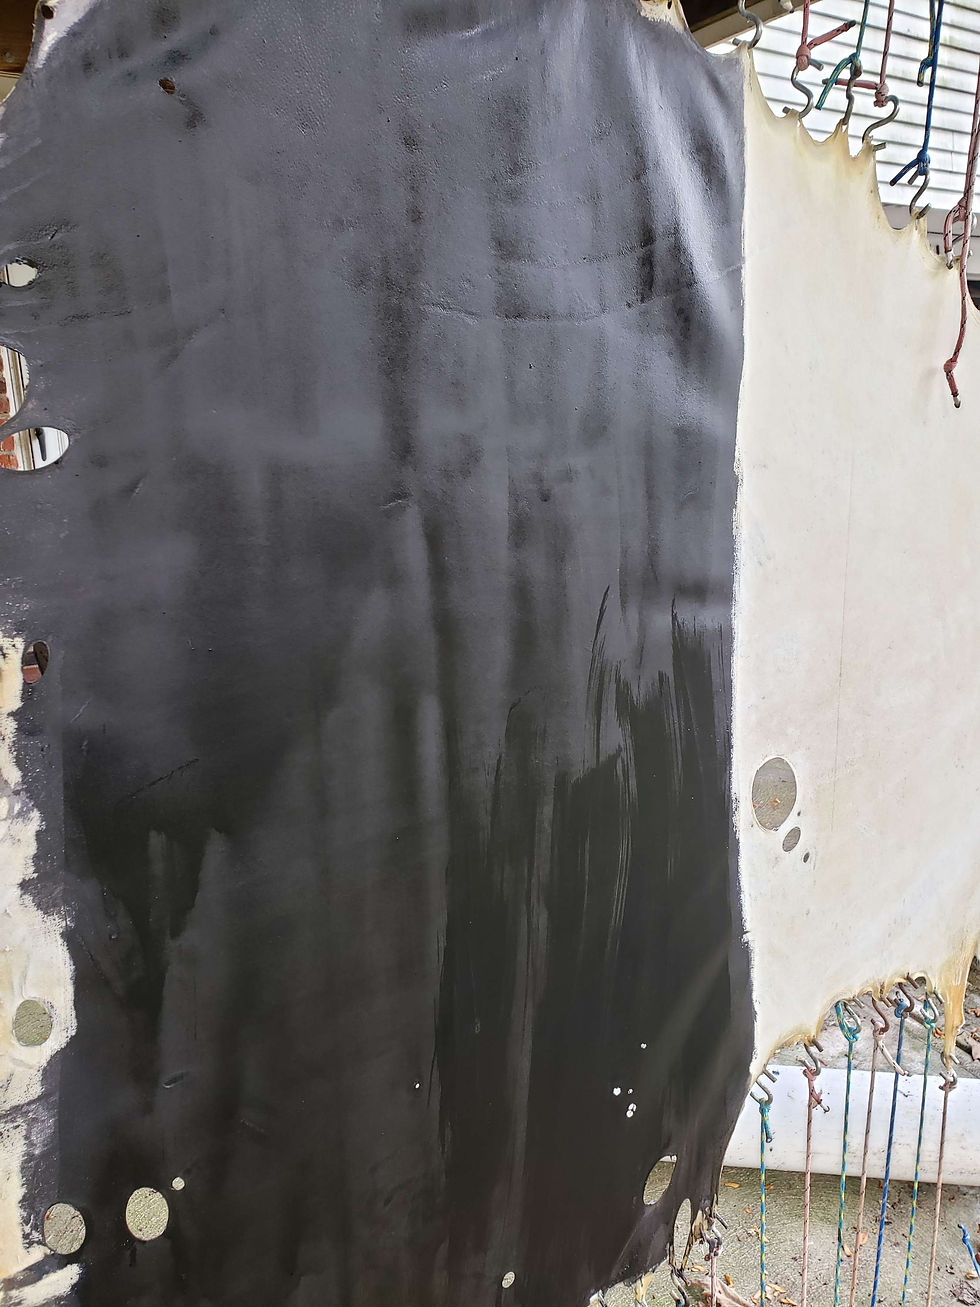
The first coat of ink takes a bit of scrubbing in, because the finished surface has a certain amount of water resistance to it. Much like wetting wool fabric. The ink will initially bead up and try to run off.

Here we can see how the first coat goes on. The lightest, middle section shows how the ink is initially repelled and shows streaks. The very top shows the way the surface starts to take the ink after a bit of rubbing with the foam brush. And the bottom, darkest area is the first rubbed-in coat of ink after it has had 24 hours to dry, bond with the parchment, and darken.
So do not be discouraged if the first coat looks light when wet. Be patient, and let the chemistry do the thing.
Often one side will absorb the initial coat better than the other. In my experience, the flesh side absorbs better than the hair side. This is likely because the flesh side generally needs more sanding and has a fuzzier texture than the comparatively slick hair side.

This is the hair side after the second coat is applied, approximately 24 hours after the first. The difference in coloration between the sides is mostly resolved. You can see how wet the hide is after the ink is applied. My experience has shown you want to get as much ink on there as possible without dripping. The highlight to the left of the holes is over an area where you can see saturation has been achieved and drips are starting to form. I simply smoothed that out with the foam brush after snapping this picture.
Here is the corresponding flesh side after the second coat. You can see it is absorbing the ink more quickly...there are no areas wet enough to shine or reflect highlights.
While a good dye job will cover up a multitude of sins in coloration, it will not resolve any texture issues. You can see in the picture above the semi circle striations from the butcher not cutting deeply enough and dragging the hide during skinning.
Below, the photo shows the dimples from around the puzzle area after dyeing. Though these will be less noticeable to the eye after drying, they will still be noticeable to the brush or pen.

Please let me know if this post was helpful to you, or if there are any questions you would like answered in my next post.


Comments